With holiday lights comes inventive ways to install them. Here is a quick tutorial by our friend who shows you the proper way to use a staple gun.
With holiday lights comes inventive ways to install them. Here is a quick tutorial by our friend who shows you the proper way to use a staple gun.
“It is not the beauty of a building you should look at; its the construction of the foundation that will stand the test of time.” David Allan Coe
It happens to all homeowners at one time or another. The incessant sound of dripping water from the faucet. Here are a few quick tips to help you stop it before you have to call.
Before You Start
• Shut off the water under the sink.
• Close the sink drain; cover it with a rag to catch dropped parts.
• Tape the jaws of your wrench with a layer of duct tape to avoid scratching the fixture.
• Establish a place to lay out parts in order of removal.
• Use distilled white vinegar and a soft scouring pad for removing mineral deposits on faucet parts.
Find Your Faucet
There are four kinds of faucets: compression, cartridge (sleeve), ceramic disk, and ball type. Each type is illustrated here. Except for the ball-type faucet, there are two illustrations for each. The less detailed version will identify the kind you have. The more detailed one will help as you make repairs.
A compression faucet relies on rubber washers to seal the valve seat. Rubber washers wear out and must be replaced occasionally. The other types, often called washerless faucets, last longer but they too can develop leaks. When these cartridge, ceramic-disk or ball-type faucets leak, you can either replace the O-ring or neoprene seal that’s causing the leak or replace the entire assembly for less than $20.
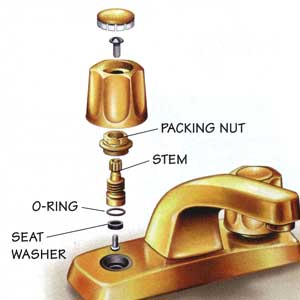
Compression Faucets
Most leaky compression faucets need new seat washers. Pry off the decorative cap on the handle, remove the handle screw, pull off the handle and use a crescent wrench to unscrew the packing nut. After unscrewing the stem, remove and replace the seat washer held in place by a brass screw. Coat the washers with nontoxic, heat-proof plumber’s grease. Pop the stem out of the packing nut and replace the O-ring, the culprit for leaky handles.
O-rings range in size from 3/8 to 5/8 in., so it’s crucial to exactly match the size on your faucet. Coat the new O-ring with the plumber’s grease. Reassemble the faucet and tighten the packing nut.
If your faucet continues to leak, the seat may be pitted. Remove the stem and grind smooth the valve seat with a valve-seat dresser, a tool you temporarily screw down into the faucet. (Compression faucet details right)
Ball-type Faucets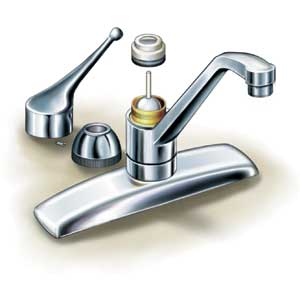
This type of faucet contains a lot of parts, and that often makes it difficult to find the cause of the leak. You can avoid the aggravation by buying a replacement kit and putting in all new parts. First, remove the handle set screw and lift off the handle. Use adjustable pliers to remove the cap and collar. Using the special tool included in the faucet-repair kit, loosen the faucet cam and lift it out along with the cam washer and the rotating ball. Reach into the faucet body with needle-nose pliers and remove the inlet seals and springs.
Next, cut off the O-rings, coat the new ones in nontoxic, heat-proof plumber’s grease and roll them on. Install new springs, valve seats and cam washers as you reassemble the faucet. Another more expensive option for an older faucet is to replace the entire fixture. You’ll need a basin wrench to do this.
Cartridge Faucets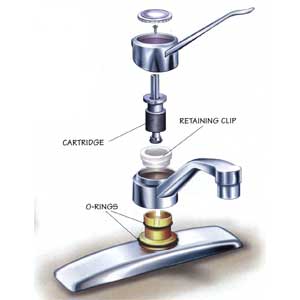
Pry off the decorative cap on the handle, remove the handle screw, tilt the handle back and pull it off.
If there’s a threaded retaining clip holding the cartridge in place, use needle-nose pliers to remove it, and then pull the cartridge straight up. Remove the spout and cut off the old O-rings using a utility knife. After coating the new O-rings with nontoxic, heat-proof plumber’s grease, reassemble the unit.
To replace the entire cartridge ($10 to $15), match the length of yours to the replacement cartridge length. Also match the stem end where the handle attaches.
Ceramic-Disk Faucets
Push the faucet handle back to access the set screw. Remove the screw and lift off the handle. Remove the escutcheon cap, unscrew the disk cylinder mounting screws and lift out the cylinder. With a blunt screwdriver, lift out the neoprene seals from the cylinder (if the seals are damaged, replace them) and use distilled white vinegar and a plastic scouring pad to clean the cylinder openings.
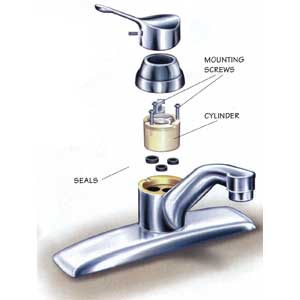
If you’re replacing the entire cylinder, which seldom is necessary, merely set it in place and secure it with the new mounting screws.
Twenty crafts to have your kiddo’s squealing with glee and your wallet, too.
Mod Mayflower
-Give a little history with your craft time with this fun ship making craft.
Tabletop Turkey
-Use this as a center piece to show all the relatives what you did to busy your Thanksgiving weekend.
Native Necklace
-History doesn’t have to be boring! Explain how all of the Native Americans wore something like this at the first Thanksgiving dinner, and maybe your kids will too!
Darlin’ Dixie Garland
-Welcome your guests with a cute, homemade banner.
Cup on the Cob
-Here’s to making Thanksgiving dinner a little easier.
Thankful String
-Have your kids go over what they are thankful for this year with this neat craft.
Thankful String alternative: Create a paper chain and write what you’re thankful for on each of the links.
Feather Place Mats
-Give a new twist on Thanksgiving decor with these fun plate mat ideas.
Hunt for Turkey Feathers
-Easter influences Turkey Day this year!
1. Buy a bunch of colorful feathers at a crafts store and hide them around the yard or house, then do a T-Day version of an Easter-egg hunt. Kids can use the feathers they collect to design a Native American headdress.
Mini Maracas Nature Craft
-Keep the kids entertained with noise making using this craft.
Appreciate Your Guests
-Give your guests a warm fuzzy feeling with this sweet idea.
1. Make place cards for everyone who will be attending your feast. Then ask your child to think of one reason she’s thankful for each person and write it on the back. Guests can read them aloud!
IMPRESS YOUR FAMILY AT THE DINNER TABLE WITH THESE 20 INTERESTING FACTS ABOUT TURKEY DAY!
 were nowhere to be found during that first Thanksgiving.

Article from: http://www.allparenting.com/my-life/articles/969379/20-thanksgiving-fun-facts-to-teach-kids
Winning the war on carpenter ants may seem impossible, but here are a few tips to help you rid the pest for good.
There are things that owners of old houses are warned about from the start. Things like wood rot, windows that stick when it rains (and sometimes are simply painted shut), termites that love to eat all that old wood, and the settling of the house that makes some floors uneven enough to be trip hazards. But for all the old houses I have ever lived in, nobody ever warned me about the toughest scourge to eliminate: Carpenter ants.
When they are in their natural habitat — out in the forest — carpenter ants are actually very helpful. They set up shop in decayed and dead trees, where they burrow away and create huge nests. They do such a good job of it that they speed up decomposition, which is great for the chain of life in the forest. But sometimes that forest wood won’t do, and they set up satellite colonies. These colonies might find the luscious, damp wood of an old house and decide that it’s the perfect spot to wreck havoc.
How to find their humble abode
Carpenter ants are sly little things. When they appear in your house, that doesn’t mean that you have an infestation. It does mean that they are close. Carpenter ants typically show up in your home because they are searching for food and water. They might be in a dying tree just outside your door or across the yard at the old shed. They might even be underneath that soft spot on your porch steps, where wood rot is taking hold. The tricky part is finding where they have set up their satellite colony.
This will take some midnight detective work — literally. Stalk them in the middle of the night, using a flashlight to spot the shiny black bodies. Then follow them to wherever they might lead you. This takes some serious time and patience (and maybe some courage, if you live out in the woods like we do).
Sometimes you might get lucky and see exactly where they are going. Unfortunately, for most homeowners it isn’t that simple. Now is the time to get up underneath the house and take a look at things. Remember that since the carpenter ants don’t actually eat the wood, they will leave plenty of shavings on the ground near the nest. They don’t actually create homes out of the wood, but use it as a way to get into hollow spaces in the house, such as the walls. That’s where they set up shop.
Another interesting (and slightly creepy) way to discover them is by using a stethoscope. Don’t have one? An inverted drinking glass might do. When you press the stethoscope against the wall and listen, you just might hear the busy rustling of those carpenter ants working away on their nest.
Once you’ve found them…
Now it’s time to get medieval, so far as the ant is concerned.
It is important to avoid serious chemicals if you can. That’s especially true if you have animals or pets on your property, small children running around, or a love of the environment. Besides that, these critters are smart — they often ignore baits completely, sauntering right around the tempting goo without a second glance.
The best way to get rid of the ants is to blow natural chemicals into their nests. A few good options are boric acid, silica aerogel, or diatomaceous earth. If you can find the nest, you can drill holes into the area and blow the treatment directly into the nest with the use of a small pump or sprayer. It is also important to eliminate the problem that allowed them to get into the house in the first place.
It often takes many applications to get control of your house back, as carpenter ants are tenacious. And besides, they often have a parent colony somewhere nearby, where they get an endless supply of fresh ants heading for the satellite colony you are trying to destroy. If you can find that parent colony, get rid of it too. But these colonies can be huge, so you might have to call in a professional contractor to help eradicate it.
Finally, make sure to prevent another infestation. Keep all firewood dry, off the ground and away from your house, bringing in only what you need when you actually need it. Replace any decaying wood and keep a close eye on the things that might cause a problem, such as clogged gutters or leaks. Seal up any holes around pipes that might be an entryway, and place a moisture barrier in your crawlspaces to help deter them even further.
Carpenter ants love your home just as much as you do, and they want to stay there forever. Taking your house back requires detective work, some chemical savvy, and patience — but in the end, you can win.

Proper lighting is essential for any home. It is important to maintain balance between personality and the functionality of the room when it comes to lighting the living room. One can transform the entire atmosphere of their living room within the proper use of lighting. One should remember that lighting not only has aesthetic and mood enhancing values, but play an important functional role in illuminating important task areas in the living room.

If you are looking to shift to a new house or want to renovate your existing one, the first thing you will need to think about is the painting. While it may be tempting to hire a professional to do it if you have never painted before, it will cost you a lot of money. Painting your own house allows you to experiment with something new and will help you save thousands of dollars.

Proper lighting is essential for any home. It is important to maintain balance between personality and the functionality of the room when it comes to lighting the living room. One can transform the entire atmosphere of their living room within the proper use of lighting. One should remember that lighting not only has aesthetic and mood enhancing values, but play an important functional role in illuminating important task areas in the living room.

If you are looking to shift to a new house or want to renovate your existing one, the first thing you will need to think about is the painting. While it may be tempting to hire a professional to do it if you have never painted before, it will cost you a lot of money. Painting your own house allows you to experiment with something new and will help you save thousands of dollars.