“I Want the Truth” About Custom Home Building From Elk Ridge Custom Homes

Church500

“You can’t handle the truth!”

Or can you?

The complete truth…nothing up the sleeve…no holds barred…we’re not lawyers so you can trust us when our lips are moving…straight up with no BS…

That sort of truth?

Yes?

Well here it is…

Elk Ridge are custom home builders first and for most.

However…

We understand that not everyone can afford a custom built one-of-a-kind $2.4 Million home on the ocean.

So we came out with homes that we ourselves would live in. Homes that our friends and family love.

There are twelve gorgeous floorplans listed for you right now on our site.

Check them out… https://elkridgecustoms.com/


Unofficially…

We played around with calling it, “Custom Within Budget”.

Why?

Because there is a lot value for what you get; we give you more than you ask for, not more than you need.

Honestly…

We want to build houses that generations will call home.

So pick up the phone…

Call us today to see what customizations we can do for you.

Elk Ridge Custom Homes

Phone: 360.553.1444

https://elkridgecustoms.com/


Certified Aging In-Place

Elk Ridge Custom Homes is proud to announce that we will be offering specialized ADA Compliant homes that meet CAP / ADA Standards to customers seeking these features.

CAP (Certified Aging In-Place) Homes:
http://www.nahb.org/en/learn/designations/certified-aging-in-place-specialist.aspx

All Features listed below are optional and built to customer specification

Brand name Moen grab bars

36″ bed/bath doors

42″ minimum hallways

zero step entries

Roll in shower

wheelchair height counters

smart house technology

specific lighting

Save Money With This #1 Winter Home Improvement

Saving money is important to everyone. The number 1 winter home improvement may surprise you. Read all of the improvements to maximize your savings!

Caulk around windows and doors, and seal up cracks and holes. Not only are you keeping out cold air, you’re keeping out mice and other critters that may seek refuge. Consider sealing around the heating ducts in the basement and attic. If necessary, add or replace weather stripping.

Put down area rugs on tile and wood floors. That creates a layer of DIY insulation, plus makes it more comfortable to walk in bare feet.
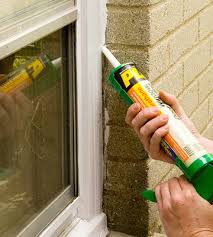
caulk windows

Cover holes around electrical outlets. You can buy covers that can be easily installed behind the plate. Put your hands down to feel around the outlets. “If you can feel that area is a little cooler … you’re losing air through that outlet,” Recknagel says. “You really do lose a lot of energy through that air escape.”

Install glass doors to close off your fireplace. Those doors keep cold air from coming down into your house and your warm air from escaping up through the chimney. If you use your fireplace, make sure you close the flue when you’re finished.

Insulate your attic door. You can buy covers for attic staircases or openings. They’re typically easy to install and remove, and they’ll help you reduce energy costs year-round.

Cover your windows. If you don’t have storm windows, you can create your own DIY storm window with a window insulation kit. Inside your house, use insulated drapes.

Buy insulated garage and exterior doors. The garage doors that come with most homes aren’t insulated. An alternative to replacing exterior doors is to add a storm door.

Add insulation. The obvious place to add insulation is the attic, but also consider the crawl space, garage and basement. If you’re doing any construction that opens up exterior walls, that’s a good time to add insulation in the walls. “If your house was insulated more than 20 years ago, an added layer in the attic always helps,” Recknagel says.

Reverse ceiling fans. Running the fans counterclockwise makes it cooler during the summer months. Reverse them to run clockwise, and they will circulate the warm air back into the room.

Change your furnace filters. Dirty filters make the furnace work less efficiently. They should be changed monthly during the heating season.

Get a programmable thermostat. Each degree you turn down the heat saves 3 percent on your bill, Recknagel says. You can set the thermostat to lower the temperature after you go to bed and raise it when you get up, for example. You can also get the same results by manually lowering a conventional thermostat, but the key is remembering to do so.

Replace your outdated furnace or heat pump. Newer units produce more heat with less energy. If you buy a new furnace, make sure you get the right size for your space.

Put a blanket around your hot water heater. That seals in the heat and keeps the water hotter longer.

Replace or repair thresholds and door sweeps. Since this is where your door seals shut, it keeps cold air from entering underneath and bringing down the temperature in your home. In a pinch, use a towel to cover a draft.


Source: Yahoo Homes

5 Winter Projects

5 Winter Projects

The days are shorter and weather is turning colder. Here are some ideas to cure you from the Winter Blues. No time?  Call us! We’re happy to help!

Paint

Paints are now made much safer than in the oil-based, lingering odor paints of the past. It’s okay to paint indoors during winter months since most paints are now water-based or synthetic.paint

Winter months are a good time to paint walls and trim. You can still leave your favorite television show on while painting or listen to music to sooth your ceiling to wall line, paint-cutting nerves.

You’ll feel much better after a project well done.

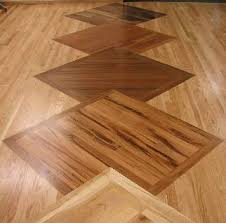
Flooringflooring

Replace outdated, or worn flooring with fresh tile, carpet, or hardwoods. Create a new backsplash above your kitchen sinks and counters.

A new look with tiles, or backings for backsplashes can be an inexpensive way to spice up your home. Everything gets a more critical look this time of year.lights

Lighting

Replace or update lighting fixtures. Whether it’s in the bathroom, kitchen, living room, dining room, bedrooms or basement, new lighting can completely change the way your home looks and feels this winter. Home Depot offers everything from the inexpensive solutions to a top-shelf look for every application, indoors, or out.

Bathroomsbathroom

Update faucets, shower and bath fixtures, and accompanying hardware to match. From chrome, brushed stainless, to hand-rubbed bronze, a new look in kitchen or baths can also add thousands to a home’s value.

Trim

Add new wood trim to doors and windows, or crown molding to the top of your walls. Winter time is great time to pull down outdated or beat up door and window trim, or add crown molding. Adding wood with texture can add a new dimension to the look in your home as well as value.

trim

Proper Use of a Staple Gun

With holiday lights comes inventive ways to install them. Here is a quick tutorial by our friend who shows you the proper way to use a staple gun.


historic home1


“It is not the beauty of a building you should look at; its the construction of the foundation that will stand the test of time.”     David Allan Coe

Link to this post

Fixing Leaky Faucets

It happens to all homeowners at one time or another. The incessant sound of dripping water from the faucet. Here are a few quick tips to help you stop it before you have to call.

Before You Start

• Shut off the water under the sink.
• Close the sink drain; cover it with a rag to catch dropped parts.
• Tape the jaws of your wrench with a layer of duct tape to avoid scratching the fixture.
• Establish a place to lay out parts in order of removal.
• Use distilled white vinegar and a soft scouring pad for removing mineral deposits on faucet parts.

Find Your Faucet

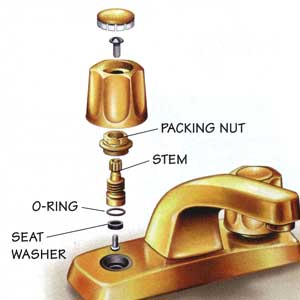
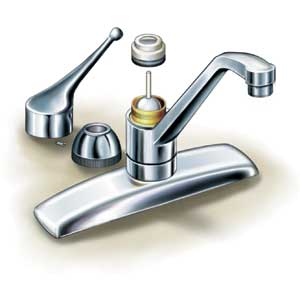
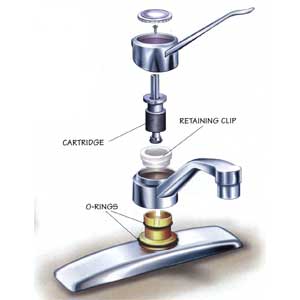
There are four kinds of faucets: compression, cartridge (sleeve), ceramic disk, and ball type. Each type is illustrated here. Except for the ball-type faucet, there are two illustrations for each. The less detailed version will identify the kind you have. The more detailed one will help as you make repairs.

A compression faucet relies on rubber washers to seal the valve seat. Rubber washers wear out and must be replaced occasionally. The other types, often called washerless faucets, last longer but they too can develop leaks. When these cartridge, ceramic-disk or ball-type faucets leak, you can either replace the O-ring or neoprene seal that’s causing the leak or replace the entire assembly for less than $20.

compression faucet details

Compression Faucets

Most leaky compression faucets need new seat washers. Pry off the decorative cap on the handle, remove the handle screw, pull off the handle and use a crescent wrench to unscrew the packing nut. After unscrewing the stem, remove and replace the seat washer held in place by a brass screw. Coat the washers with nontoxic, heat-proof plumber’s grease. Pop the stem out of the packing nut and replace the O-ring, the culprit for leaky handles.

O-rings range in size from 3/8 to 5/8 in., so it’s crucial to exactly match the size on your faucet. Coat the new O-ring with the plumber’s grease. Reassemble the faucet and tighten the packing nut.

If your faucet continues to leak, the seat may be pitted. Remove the stem and grind smooth the valve seat with a valve-seat dresser, a tool you temporarily screw down into the faucet. (Compression faucet details right)

Ball-type FaucetsBall-type faucet

This type of faucet contains a lot of parts, and that often makes it difficult to find the cause of the leak. You can avoid the aggravation by buying a replacement kit and putting in all new parts. First, remove the handle set screw and lift off the handle. Use adjustable pliers to remove the cap and collar. Using the special tool included in the faucet-repair kit, loosen the faucet cam and lift it out along with the cam washer and the rotating ball. Reach into the faucet body with needle-nose pliers and remove the inlet seals and springs.

Next, cut off the O-rings, coat the new ones in nontoxic, heat-proof plumber’s grease and roll them on. Install new springs, valve seats and cam washers as you reassemble the faucet. Another more expensive option for an older faucet is to replace the entire fixture. You’ll need a basin wrench to do this.


Cartridge Faucetscartridge faucet details

Pry off the decorative cap on the handle, remove the handle screw, tilt the handle back and pull it off.

If there’s a threaded retaining clip holding the cartridge in place, use needle-nose pliers to remove it, and then pull the cartridge straight up. Remove the spout and cut off the old O-rings using a utility knife. After coating the new O-rings with nontoxic, heat-proof plumber’s grease, reassemble the unit.

To replace the entire cartridge ($10 to $15), match the length of yours to the replacement cartridge length. Also match the stem end where the handle attaches.

Ceramic-Disk Faucets

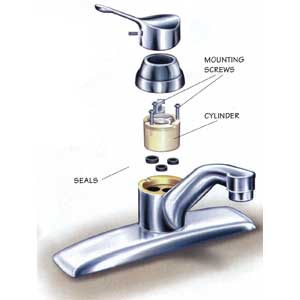
Push the faucet handle back to access the set screw. Remove the screw and lift off the handle. Remove the escutcheon cap, unscrew the disk cylinder mounting screws and lift out the cylinder. With a blunt screwdriver, lift out the neoprene seals from the cylinder (if the seals are damaged, replace them) and use distilled white vinegar and a plastic scouring pad to clean the cylinder openings.

ceramic-disk faucet details
Ceramic-disk faucet details
Rinse thoroughly. Then replace the seals and reassemble the faucet. Move the handle to the “on” position and very slowly turn the water back on—the force of the returning water can fracture the ceramic disk.

If you’re replacing the entire cylinder, which seldom is necessary, merely set it in place and secure it with the new mounting screws.


10 Arts & Crafts To Do At Home!

Twenty crafts to have your kiddo’s squealing with glee and your wallet, too.

Mod Mayflower

-Give a little history with your craft time with this fun ship making craft.

  1. Cut off the bottom of a cup. Cut two slits with the tip of your scissors at the center edge of the cup. Place the cup, bottom side up, into the center of a cup holder.
  2. Cut 2 paper rectangles per boat to make sails. Cut 2 tiny slits at the center of each sail at the top and bottom. Push stirrers through the slits.
  3. Add a paper flag to the top of each mast. Push the sticks into the slits in the cup.

Tabletop Turkey

-Use this as a center piece to show all the relatives what you did to busy your Thanksgiving weekend.

  1. Paint a paper cup brown. Turn the cup upside down and glue a pom-pom to the top of the cup for the head.
  2. Cut nine 4-inch leaf shapes from different colors of construction paper. Fold a 1-inch-square piece of orange construction paper in half; cut a triangle shape out of the folded paper for the beak. Using a 2-inch square of red paper folded in half, cut a heart shape to create the turkey’s wattle.
  3. Glue the beak and wattle to the pom-pom. Add googly eyes. Glue on the “feathers.”

Native Necklace

-History doesn’t have to be boring! Explain how all of the Native Americans wore something like this at the first Thanksgiving dinner, and maybe your kids will too!

  1. Remove the top ring of a paper cup. Punch 2 holes in the top of the ring and 1 hole in the bottom center. Paint the ring.
  2. Cut a 20-inch piece of cord. String 1 bead on each end. Make a loop and place one end through each top hole. String a few wooden beads onto the cord, creating a “Y” shape. Push 2 cords through the center hole. Add a single bead to keep in place.
  3. Attach a feather and bead to each end of the cord to finish.

Darlin’ Dixie Garland

-Welcome your guests with a cute, homemade banner.

  1. Cut apart a Dixie cup so it lies flat to create a template. Trace it onto decorative paper, adding an extra 1/2 inch on one end, and cut out 7 shapes (adults should handle this part).
  2. Place a strip of double-sided tape on one end of each paper. Wrap paper around each of 7 cups and attach with tape. Now cut out letters that spell “Welcome.” Glue a letter to the front of each cup.
  3. Using a utility knife, cut an X in the center of each cup bottom. Push 1 light into the bottom of each cup and hang in an entryway to welcome your holiday guests.

Cup on the Cob

-Here’s to making Thanksgiving dinner a little easier.

  1. Cut an oval corncob shape slightly larger than the paper cup out of yellow construction paper. With crayons, draw kernels on the paper. Glue to the front of the cup.
  2. Cut a piece of crepe paper, 11 inches high by 12 inches long (this may vary depending on size of cup). Glue the crepe paper around the cup to create the corn husk. Crinkle and gather the paper at the top as you glue around the cup.
  3. Fill a snack bag with popcorn and place inside the cup. Gather the top of the crepe paper and tie with a piece of raffia.

Thankful String

-Have your kids go over what they are thankful for this year with this neat craft.

  1. With a felt needle, string 2-cm felt balls ($10 for two needles, $20 for 60 balls; handbehgfelts.etsy.com) onto a thin 30-inch hemp cord; tie a knot at each end.
  2. Trim shaft ends of five feathers to be 1 inch.
  3. String two wooden beads onto each shaft.
  4. Place a 6-inch piece of braided cording against feather shaft (below beads), then secure to shaft by wrapping with hemp cord; tie off securely. Repeat with remaining feathers.
  5. Have everyone write what they’re most thankful for on a small piece of paper; punch holes in papers and thread onto cording.
  6. Tie each feather between two felt beads on string; trim excess cording.
  7. Hang string between tepees.

Thankful String alternative: Create a paper chain and write what you’re thankful for on each of the links.

Feather Place Mats

-Give a new twist on Thanksgiving decor with these fun plate mat ideas.

  1. Trace the largest plate you’ll be using on pieces of scrapbook paper. Cut out circles.
  2. Glue feathers along edges, leaving paper centers blank (they’ll be covered by the plates).

Hunt for Turkey Feathers

-Easter influences Turkey Day this year!
1. Buy a bunch of colorful feathers at a crafts store and hide them around the yard or house, then do a T-Day version of an Easter-egg hunt. Kids can use the feathers they collect to design a Native American headdress.

Mini Maracas Nature Craft

-Keep the kids entertained with noise making using this craft.

  1. Cut out a section (top and bottom) of an egg carton and fill one side with dried beans.
  2. Glue the sides together, with an ice-pop stick coming out of the middle.
  3. Paint with orange paint, let dry and push a green pipe cleaner into the top as a stem; slip on a green construction-paper “leaf” and bend pipe cleaner over in a loop.

Appreciate Your Guests

-Give your guests a warm fuzzy feeling with this sweet idea.
1. Make place cards for everyone who will be attending your feast. Then ask your child to think of one reason she’s thankful for each person and write it on the back. Guests can read them aloud!


 Article from: http://www.parenting.com/gallery/thanksgiving-crafts-ideas?cmpid=obinsite